A few days back, I wrote an article - CI/CD using GitLab
. In that article, I
talked about implementing CI/CD using GitLab, which is used to automate build,
test, deploy, and monitor your applications. Since then, I’ve moved onto
another organization, my favorite, GitHub. And in this guide, I will
walk you through - how to build your own CI/CD pipeline right from the start
using your repository on GitHub.
But before getting all worked up to involve ourselves in implementing CI/CD
using GitHub, let's get into knowing what CI/CD means.
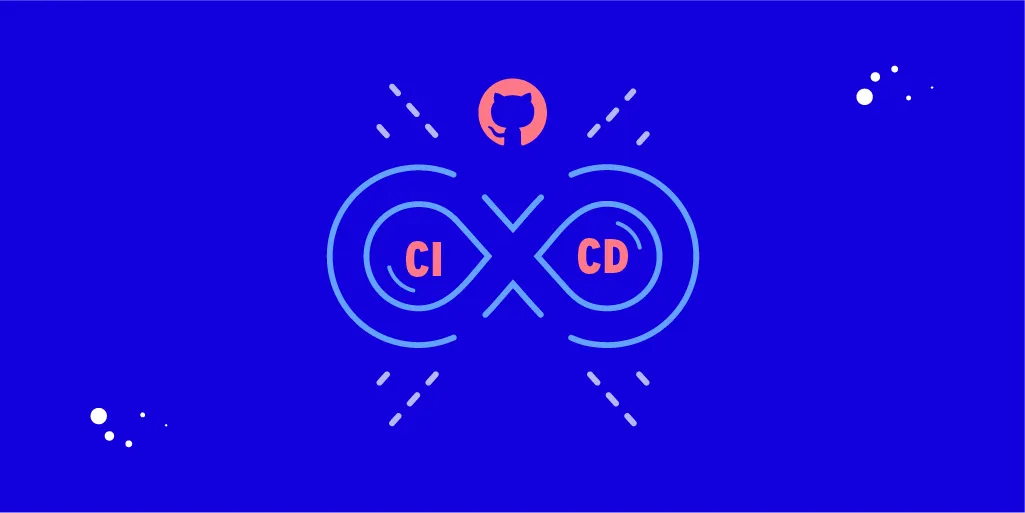
What is CI/CD?
Continuous Integration(CI)/Continuous Delivery (CD) is the most commonly used
practice in software development that helps in compiling, packaging, linking,
and integrating code changes incrementally. Besides that, CI/CD has long been
the domain of experts from the DevOps field, and it continues to be their
favorite. But with introducing native CI/CD to GitHub in 2019 via GitHub
Actions ,
it’s easier than ever to bring CI/CD directly into your workflow right from
your repository.
That’s a great thing from a developer's point of view since it is required to
use peer reviews to ensure the code works. But I’m here to let you know
you can disrupt the peer review and have confidence in your code if you are
using Git, GitHub, and GitHub Actions to build a CI/CD pipeline.
And at this point, I’m assuming you have an understanding of what CI/CD means
and how it’s deployed using GitLab and the terms - pipeline, runner, xcpretty,
Fastlane, etc., and how they work & why we use them. If not, find that all in
the previous blog - CI-CD using GitLab, as mentioned at the beginning of this
article. Also, we won’t be using Travis, Jenkins , Circle Ci,
Fastlane ,App Center, or any other CI/CD tool except GitHub Actions.
But, before moving forward, let's know why we use GitHub CI-CD instead
of GitLab CI-CD. It's simple, GitHub provides a virtual system for CI-CD
works, which means your lots of headaches are now GitHub's problems. Hence, no
need to worry about configuring runner or Fastlane or others. So, just be at
ease and scroll down to know GitHub Action.
What is GitHub Action anyway?
GitHub Actions is a CI-CD platform that allows automating build, test, and
deployment pipeline/workflow automation. It's to be noted that GitHub provides
a free CI/CD service only for public repo. Actually, GitHub announced GitHub
Actions (a free-to-use service) in the summer of 2019. Using this tool, one
can analyze, build, test, and deploy projects on any platform, language, and cloud out there.
Anyway, our goal here in this guide is to learn to automate, build, test,
and deploy an iOS project with no need for external tools except GitHub
Actions. Therefore, we won't introduce Travis, Jenkins, Circle Ci, Fastlane,
App Center or any other CI/CD tool whatsoever. Now, since we want to
understand what this CI/CD process involves, it wouldn't be fair not to
mention what workflow means in CI/CD Workflow.” So, what is it?
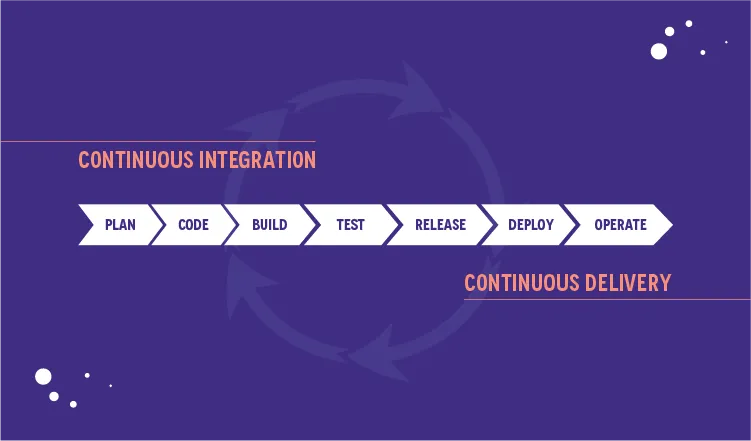
What is Workflow in CI/CD Workflow Process?
There is nothing to get confused about, and it's simple. In GitLab, workflow
is known as the pipeline's name, and its work is similar. It's just the
difference in the title. You need to pull a request from a specific/branch or
push to trigger a workflow. Or you can trigger the same using tags, schedules, or other ways .
Remember, a workflow requires at least one job. Here, a job is like a function
containing steps needed to perform individual tasks and steps
that can run commands or use an action. Hence, the name GitHub Actions. Do not
forget that.
Key benefits of using GitHub Actions for CI-CD pipeline(s)
There are a lot of tools out there that can do what GitHub can, but let me
unpack four tremendous advantages that make you fall in love with GitHub Actions :
1. Ease in setting up CI/CD pipelines:
GitHub Actions - “by developers and for developers.” So, there is no need for
dedicated resources when you want to set up and maintain your pipeline. The
best part is that you don't have to manually configure and set it up. That's
amazing, right? And there is no need to set up webhooks, buy hardware, reserve
some instances out there, keep them up to date, do security patches or spool
down idle machines. You only need to drop one file in your repository
and leave! It works.
2. It’s easy to trigger any Webhook on GitHub:
GitHub Actions is highly integrated with GitHub. Thus, setting up any
webhook as an event trigger is easy if you want to automate any CI/CD pipeline. This
involves - pulling requests, issues, and comments. And it also includes
webhooks from any app integrated into your GitHub repository.
3. For instance
Suppose you want to use any of the many tools out there to run a few parts of
your app development pipeline. Then, with GitHub Actions, you can easily
trigger CI/CD workflows and pipelines of webhooks from these apps. These apps
may be simple, like a messenger app, provided the messenger app is
integrated into your GitHub repository.
4. Reusable workflows - Powered by a Community:
Since GitHub is now a free-to-use service, it is an online community where you
can share your workflows for public use and a wider GitHub community. Also, it
allows you to access pre-built CI/CD workflows already there in the GitHub
Marketplace. You would be surprised by the numbers -there are over 11,000
available actions! And every action is reusable. All you need is to reference
its name!
5. GitHub Actions is platform-agnostic:
Meaning use GitHub Action with whatever technology you use since it supports
any platform, language, and cloud. And that's way beyond just being fabulous!
Right?
Now, I guess you’re ready to understand how to automate CI/CD using GitHub
actions. I am using the “guess” word here is because I have spent several
hours learning how to use GitHub Actions to automate my CI/CD process. While
there were many resources about the individual steps, below are the simple
steps I’ve pulled together for your easy understanding.
Okay, so let’s do this.
Step-by-step instructions to implement CI/CD using GitHub Actions
Step - 1: Create an IOS project.
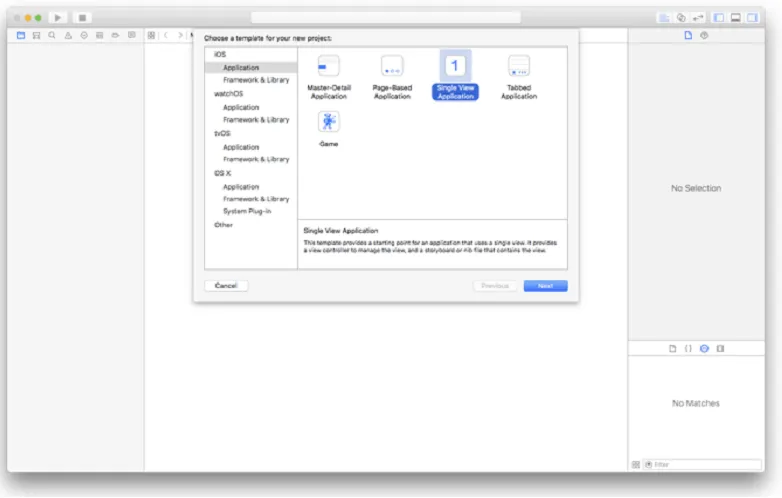
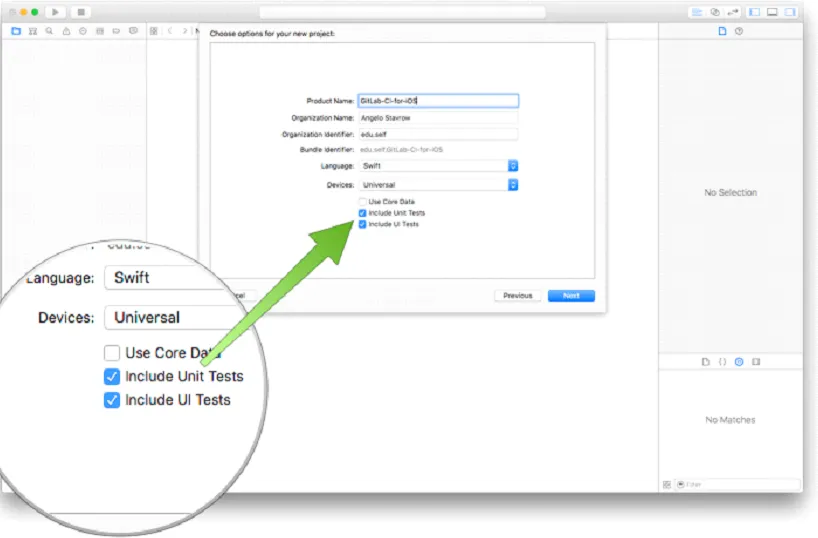
- We'll start by creating a new single-view iOS project in Xcode as usable as we develop.
- Give your project a name and ensure that the Include Unit Tests and Include UI Tests options are enabled for the project. Xcode will create a template test class with some sample tests, which we'll use in this post as the test suite that GitHub CI-CD runs to verify a build. Choose a name for your project and click on Next .
Now, what happens if these options are not enabled in your project? Don’t
worry because I am here to rescue you.
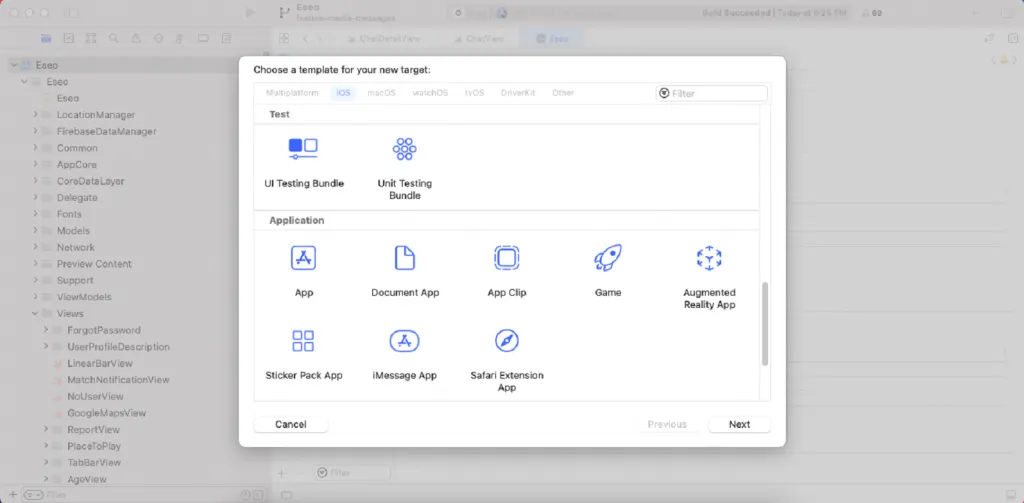
Here, you have two options to overcome this situation.
First, you can add these options to your existing project. Then, just
click Menu File > New > Target… and Test the proper SDK. You can take a
reference to the below-mentioned screenshot:
Second, you can continue without including these options, which means you
can implement CI-CD without having the Unit test. But remember one thing: if
you don’t include Unit Test in your project, you can’t run an auto unit test
script in your “.yml” file. So make sure your “.yml” file doesn’t contain any
unit test-related script, or else your pipeline/workflow will fail.
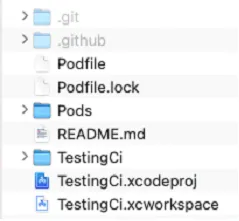
Step - 2: Create a repository on your GitHub project.
we usually create, and push your complete task in this repo (“repo” for
repository).
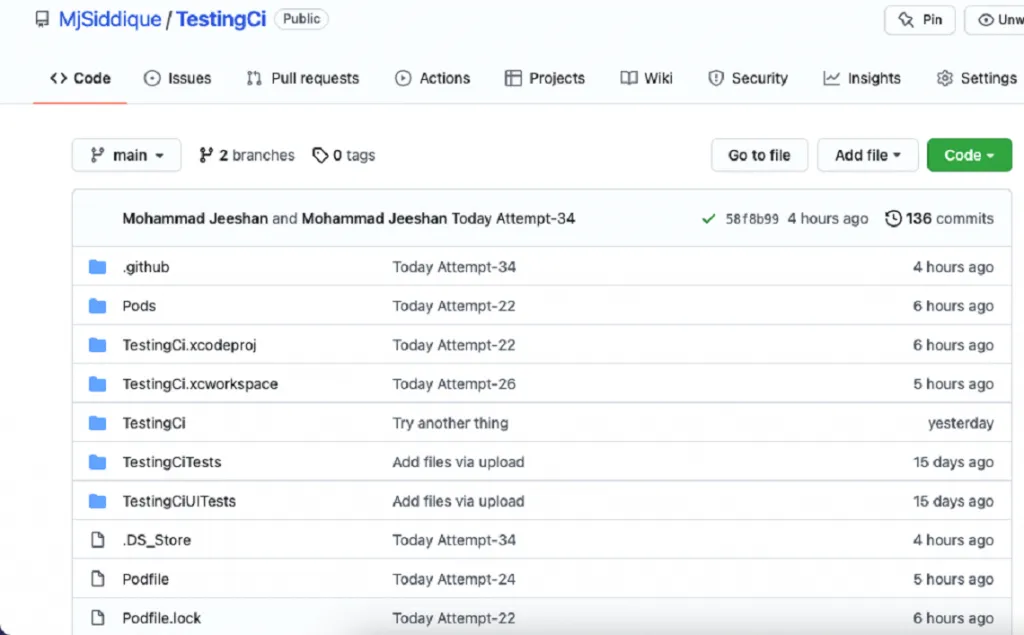
Now your project looks like this. In the above screenshot, the Action option
is present there. Please click on this option. After clicking, you will land
on this page, where you can find lots of options. GitHub will create a default
“.yml” file for you by clicking these options. You can choose any option
according to your requirements.
But, you'll encounter:
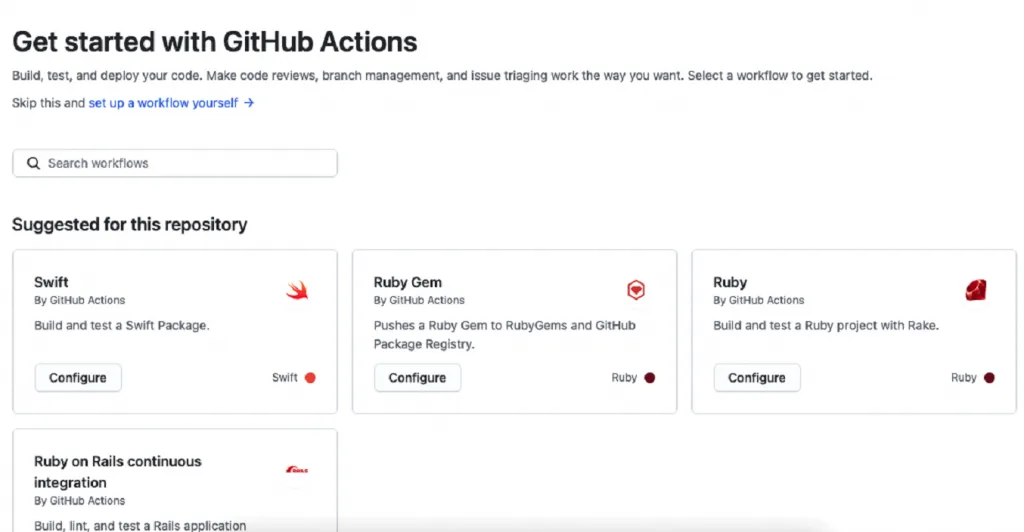
I recommend you, please create your custom “.yml” file. You can create a
“.yml” file using the terminal. Just go to your project directory by the
airport and run the “touch main.yml” command in your terminal. Now put this”
.yml” file under the “.github” directory.
You can take a reference to the screenshot mentioned above. Because when you
run the touchmain.yml command in your terminal. The system then will create
this file in your current directory. That is, this main.yml file is your
.github directory.
The second option you can create a “.yml” file by clicking set up a workflow
yourself option, which you can find in the above screenshot. I recommend you
to go with this option. It's pretty simple to use.
Step-3: Create your workflow script, which will run GitHub Actions for CI-CD
You can create your custom workflow script using this link -
https://docs.github.com/en/actions/using-workflows/workflow-syntax-for-github-
actions
I am also sharing my script, which will help you save valuable time.
Note: All the following images are from the whole script.
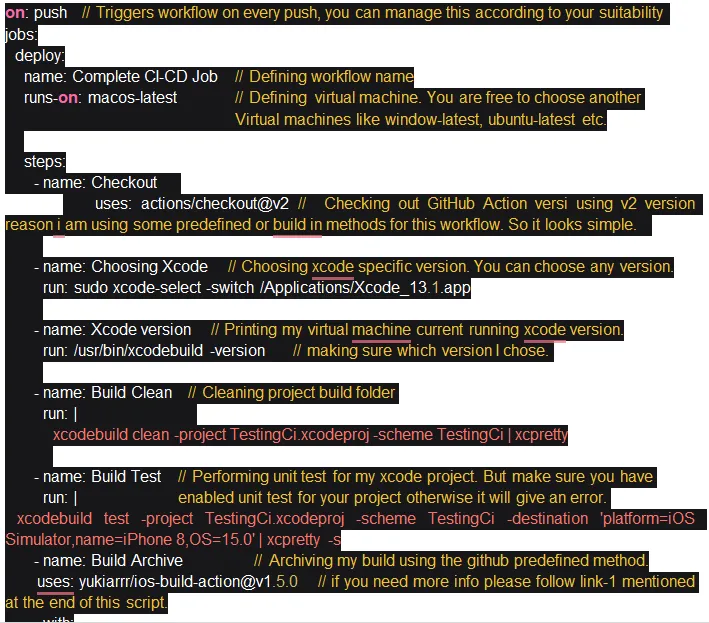
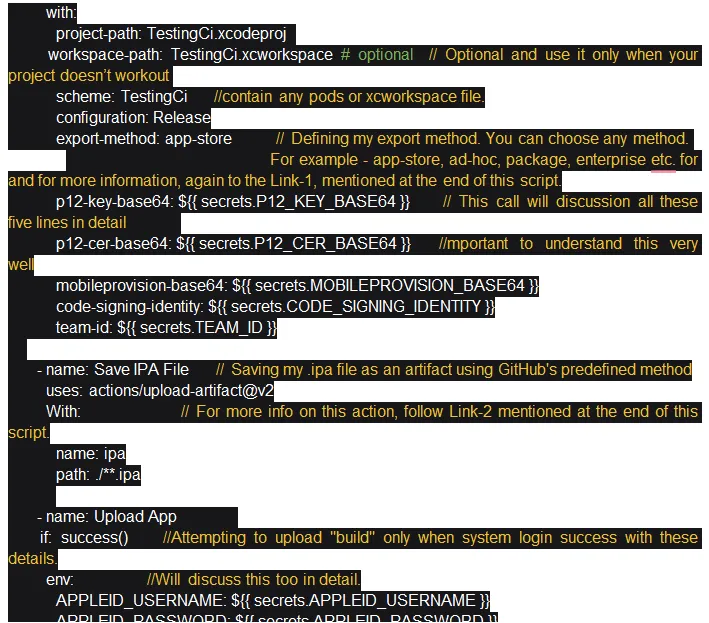

For reference:
https://github.com/yukiarrr/ios-build-action
https://github.com/actions/upload-artifact
Congratulations, your project has been set up & your “.yml” script also has
been ready. Now time to celebrate, but wait, your workflow will fail. All is
good; your project has been set up on GitHub, your workflow/pipeline script
has been ready, your virtual runner, mac os also has been prepared. But your
GitHub secret is still pending…
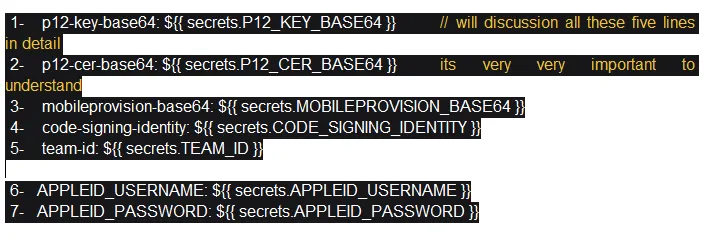
All these seven points are pending to understand, but before understanding all
these seven points, let's first discuss some important things.
Now again, you’re wondering, what is GitHub Secret ?
Secrets are encrypted environment variables you create in an organization,
repository, or repository environment. The secrets that you make are available
to use in GitHub Actions workflows. GitHub uses a libsodium sealed box
to
help ensure that secrets are encrypted before they reach GitHub and remain
encrypted until you use them in a workflow.
Next, you’ve got a question, how to create GitHub Secret ?
You can create your GitHub Secret for your repo. Just click on the setting
of your repository where you want to add your GitHub secrets . You can take
a reference of this screenshot which is given below.
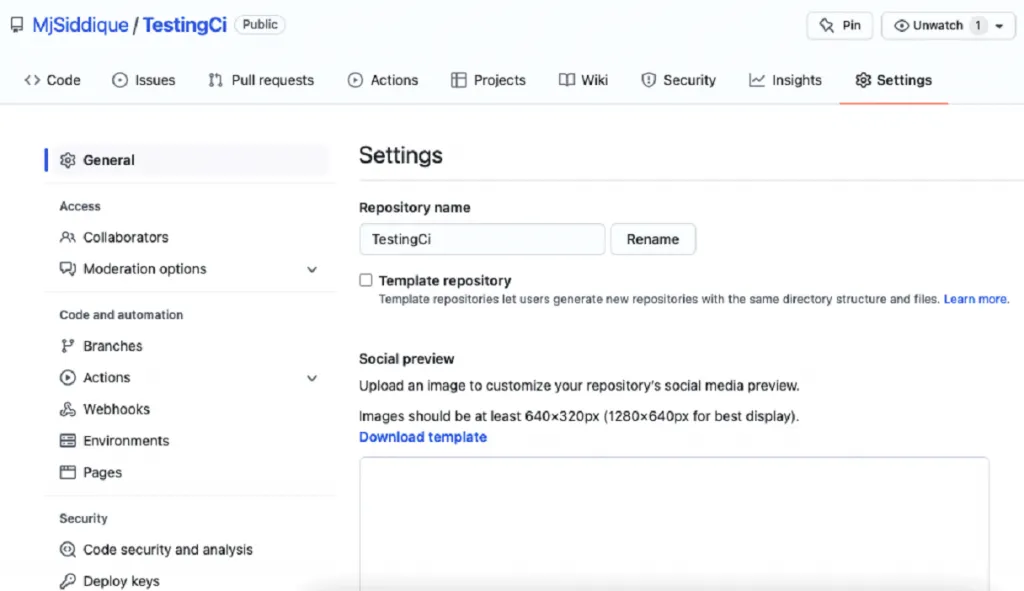
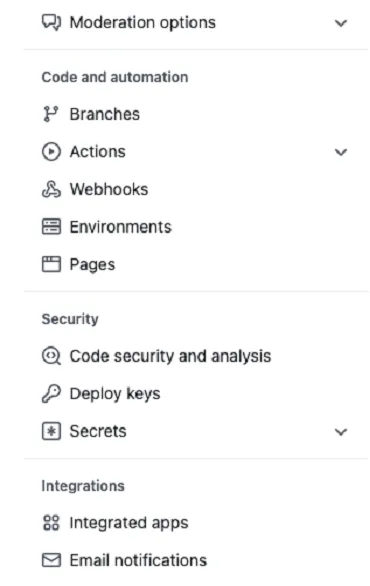
If you scroll down your repository setting page, you can see a Secrets option.
So just click on this option and add some secrets to your repository.
Now is the time to discuss the seven points mentioned above.
1. p12-key-base64: ${{ secrets.P12_KEY_BASE64 }} -
This is a pre-defined command, and for this, you just need to add
P12_Key_Base64 secret,
Note : name doesn’t matter; you just need to store Base64 encoded
certificate for the p12 key.
Before moving to the second point, let's discuss how to encode certificate p12
files into Base64.
There are two options:
First, you can use any online base64 encoder which converts your P12 file
into a string. So just code that string into your GitHub secrets.
Second, you can convert your p12 file or any encodable file into base64 by
your macOS terminal. Just go to your current directory where that file is
saved and run the “base64 -i certificate.p12 -o outputfile” command where
certificate.p12 is your file, & outputfile is your base64 encoded file.
2. p12-cer-base64: ${{ secrets.P12_CER_BASE64 }} -
This is again a pre-defined command; for this, you just need to add
P12_Cer_Base64 secret Important,
Note: name doesn’t matter; you just need to store the “Base64” encoded
certificate file. You can follow the same command for this one as well.
3. mobileprovision-base64:${{secrets.MOBILEPROVISION_BASE64 }} -
This is a pre-defined command; you just need to add MOBILEPROVISION_BASE64
secret Important.
Note: name doesn’t matter; you just need to store Base64 encoded
provisioning profile file. You can follow the same command for this one as
well.
4. code-signing-identity: ${{ secrets.CODE_SIGNING_IDENTITY }} -
Again, this is a pre-defined command. For this, you just need to add your
Code_Signing_identity secret Important,
Note: name doesn’t matter. But for this secret, you do not need to encode
base64. You just simply add your project code signing identity as a GitHub
secret.
5. team-id: ${{ secrets.TEAM_ID }} -
Again, this is a pre-defined command. For this, you just need to add your
Team_Id secret Important.
Note: Name doesn’t matter. But for this secret, you do not need to encode
base64. You just simply add your project team ID as a GitHub secret.
6. APPLEID_USERNAME: ${{ secrets.APPLEID_USERNAME } -
For this, you need to add your Apple account username as GitHub secret
Important.
Note: Name doesn’t matter but makes sure it should be the same. Simply add
your project Apple account username as GitHub secret with no code64 encoder.
7.APPLEID_PASSWORD: ${{ secrets.APPLEID_PASSWORD }} -
For this, you need to add your Apple account app-specific password as GitHub
secret Important,
Note: Name doesn’t matter but makes sure it should be the same. Simply add
your project Apple account app-specific password as GitHub secret with no
code64 encoder.
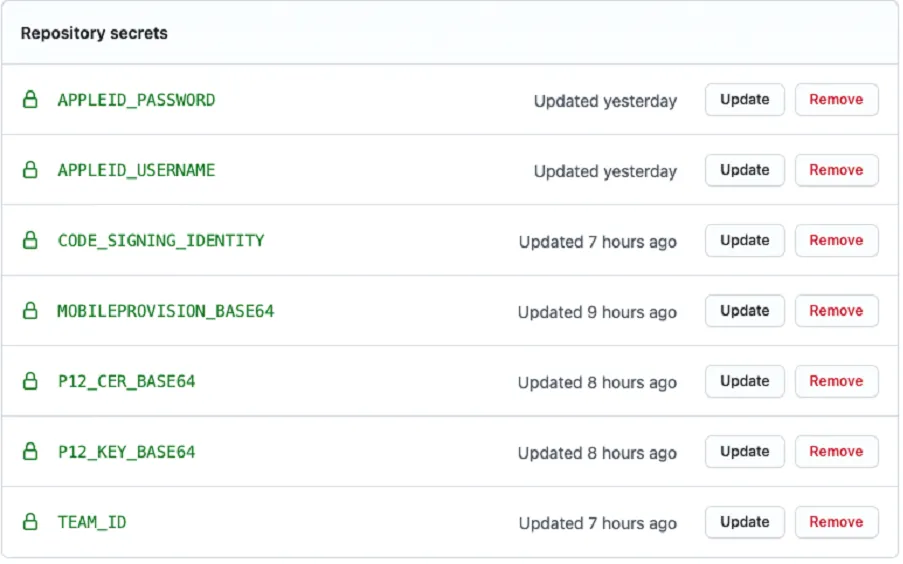
After adding all these secrets, your private project repo looks like
this:
Congratulations, you successfully implemented CI-CD using GitHub Actions -
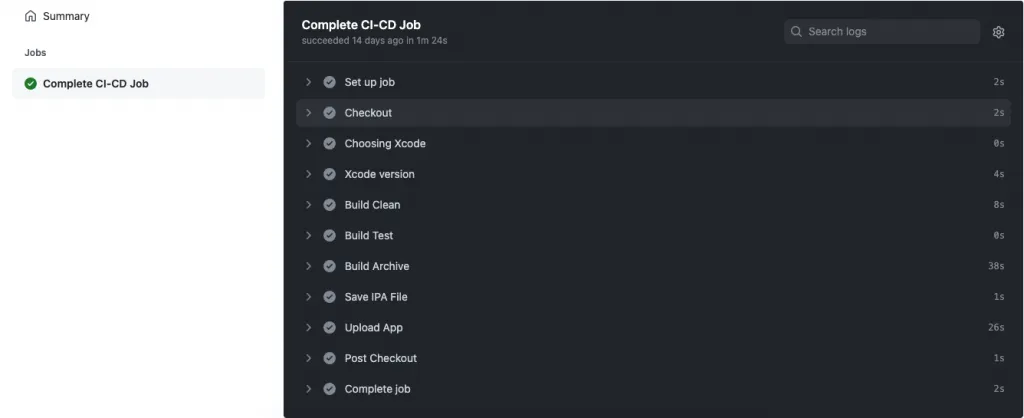
Using this script, your build will live on TestFlight & you can also download
your project “.ipa” file from your git repo. But just change the script
trigger setting because I’m triggering my workflow on every code push this
time.
Tags