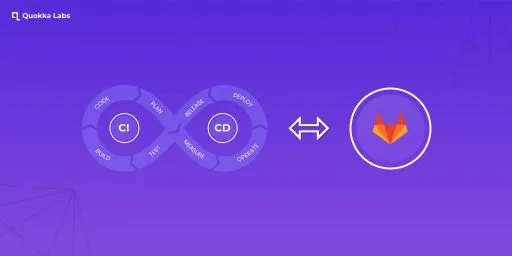
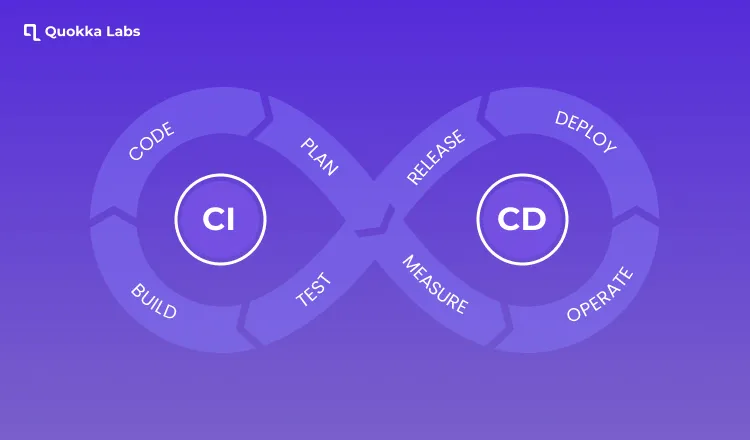
CI ( Continuous Integration ) / CD( Continuous Delivery ) are commonly used combined practices in the S/W development field that help developers incrementally compile, pack, link, and integrate code changes.
Not only this, but they (CI and CD) are also assisting a lot in defeating the existing software anomalies and side-by-side increasing productivity of intermediate, beginner-level, or advanced developers by helping them create a newer software version—without ignoring every aspect of SDLC.
Let’s know about CI-CD using GitLab.
What is a Continuous integration(CI?)
Continuous integration (CI) is an excellent tool for helping developers be more productive and write higher-quality code. And its best part is that every developer can recognize the modifications/ changes in the codebase by running (actively) a collection of quality tests, thereby making integration(s) swifter and flexible.
What is a CD?
In short, continuous delivery begins its play at an instance CI’s process completes. Furthermore, apps/ applications to be delivered according to computing environments are automated so that team(s) may work with utmost flexibility, keeping in mind all the aspects of testing/ development. And such a sorted approach works miracles at times changes in complex/ mid-level codes
are pushed to appropriate production environments.
Work Flow Of CI-CD:
- Go ahead/ proceed with applying changes to the available codebase’s copy. Later, pushing changes’ commit will be a good-to-go option.
- GitLab recognizes that the codebase has changed
- GitLab will then be setting off a build, and that, too, with the GitLab Runner. Now, you should be heading toward your assigned Macintosh project.
- The GitLab Runner runs through the build and test process you specified in GitLab-ci.yml
- The GitLab Runner is quick with reporting/ describing its results amazingly to GitLab.
- GitLab, in response, will showcase the required build results to you.
Note: This post will assist in offering a step-by-step guide that a developer may use to set up GitLab CI for any iOS projects. And all this must be implemented from the initial point till the finish.
The time has now come to follow the listed-below footprints: -
Step-1: Create an IOS project
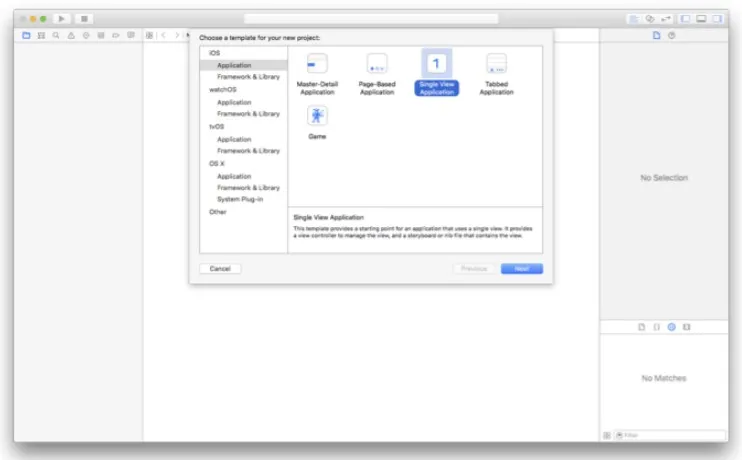
- We'll start by creating a new single-view iOS project in Xcode as usable as we develop.
- Better consider giving a name to your project (current/ upcoming). And also, be assured of the fact that the Include UnitTests options aren’t disabled somehow.
- Xcode will proceed with building/creating a template test class (here, it is obvious to expect some sample tests).
- Moreover, those samples we will be for sure using in this post. Reason?? The test suite that - - - - GitLab CI will be running/runs verify the build available.
- Choose, for now, an alias/ reference name for your current/ futuristic project. Later, do not feel hesitant about clicking the Next button .
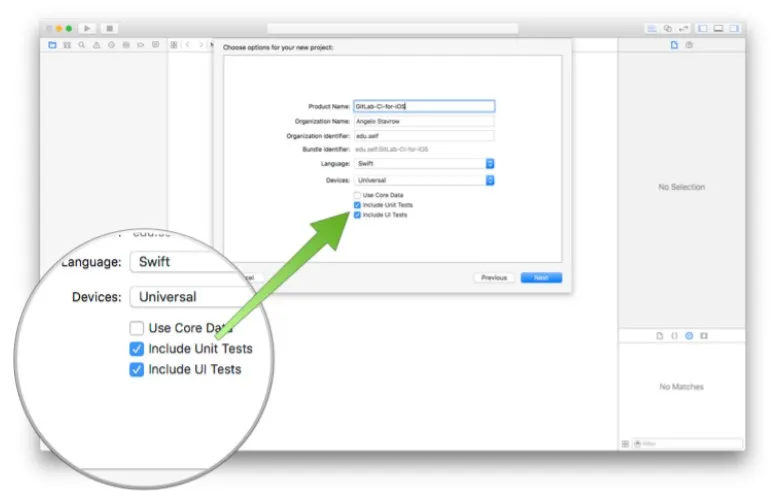
What happens if these options are not enabled in your project?
Don’t worry; I am here to rescue you from this situation. You have two options.
First Option
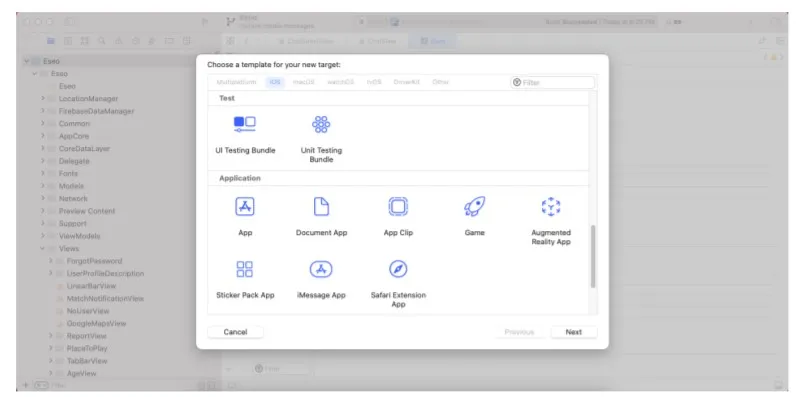
The first one is you can add these options to your existing project.
- Patiently, with the cursor, select/hit Menu.
- Later, the File option will be visible to your eyes.
- Thereupon, selecting New proceeded by Target.
- And at last, Test (of the appropriate SDK/ Software Development Toolkit).
Second option
You can continue without including these options, which means you can implement CI-CD without including the Unit test.
But remember one thing: -
“If you don’t include Unit Test in your project, then you can’t run auto unit test script in your .yml file.”
So ensure your .yml file doesn’t contain any unit test-related script; otherwise, our pipeline will fail.
Now you are thinking about what is script & pipeline. Don’t worry. I’m here.
Let's first understand what a script is. & why are we using it here?
- The script is a simple language with instructions for a run-time environment. We use a script for our .yml file, which helps to automate our traditional process.
- Pipeline, without any further hesitations, Pipeline can capably introduce automation + continuous monitoring entirely in the software's / product's lifecycle. Indistinguishably, its traces are affirmingly evident from integration, then the testing phase (until a developer/ team of developers finally reaches deployment, followed by delivery). Shortly & crisply, the s/w delivery process is automated via CI/CD pipeline's presence. And who knows - you are the upcoming developer building/ creating codes, running error-free tests, and safer deploying a newer s/w (i.e., software) version!!!!
- Now Share your project schemes: To share a scheme in Xcode, choose Product > Scheme > Manage Schemes.
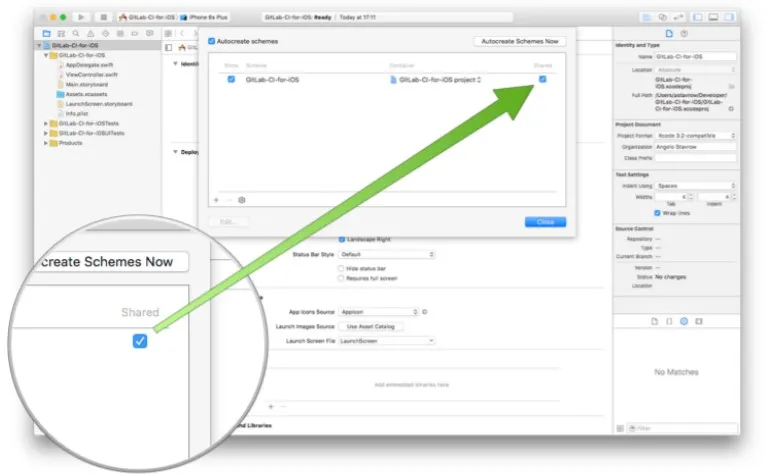
Why do we share our project schemes?
By sharing your scheme, GitLab CI gets the context it needs to build and test your project by sharing your scheme. It's imperative to don’t forget to share your project's schemes.
- After this, add some lines in your .gitIgnore file. You can see it here:- https://www.toptal.com/developers/gitignore/api/swift
- Another way to add these lines in your .gitignore file is to go to your project directory through the terminal & run the following command.
curl-o.gitignore https://www.toptal.com/developers/gitignore/api/swift
- After this, some lines will automatically add to your .gitignore file.
Step-2: Install xcpretty
Now you are thinking, What is xcpretty, and why do we use it?
In clear-&-crisp words, pretty is undoubtedly an easy-to-use, scalable, plus (+) efficient formattor for the command-line Xcodebuild tool. And at times, Xcode steps ahead for testing and building your futuristic/ current Gitlab project, there this command-line tool amazingly transforms the output in a readable format. Thereafter, xcpretty reads (the obtained output) in an
easy-peasy manner.
How to install xcpretty on your mac?
It's straightforward - just run your terminal's gem install xcpretty command. And boom - it will automatically download xcpretty in your mac machine.
For better installation understanding, the aforementioned link works
https://github.com/xcpretty
Step-3: Install the GitLab Runner
Before installing GitLab runner, let’s discuss first: What is GitLab-runner?
GitLab Runner application works brilliantly with GitLab CI (it means Continuous Integration)/CD (Continuous Delivery) for running the assigned/ unassigned jobs well in the selected/ not-selected pipeline.
Basically, GitLab Runner is open-source and written in the Go programming language. One can flexibly execute/run this as binary or single; no dire need to explain language-specific requirements. You can proceed with the secure and easy-to-implement installation instructions of GitLab Runner, which can supportively execute on Windows, Macintosh, or other operating systems.
For more information about the Gitlab Runner, please go through the following
link https://docs.gitlab.com/runner/
Next Question: How to install Gitlab-Runner on Mac OS?
For this, I am adding an official link on how to install Gitlab-Runner on Mac OS? https://docs.gitlab.com/runner/install/osx.html. In this link, you can see there are two methods to install GitLab-runner:
- First one: Manual installation (official)
- Second one: Homebrew installation (alternative)
In my case, I tried both methods, but I really like the Homebrew method.
However, GitLab does not maintain the Homebrew formula but don’t worry;
Homebrew maintains their services by themselves.
For more info:- https://formulae.brew.sh/formula/gitlab-runner
Step-4: Register the GitLab Runner with your local machine
It's important to your CI-CD implementation, but don’t worry.
- First, go to the project directory where your project exists and run the GitLab -runner command. This command will list down all the runner commands that help you understand.
- Second, run the GitLab -runner register command. After this, you will see this screen. Here it will ask you to enter your GitLab instance URL.
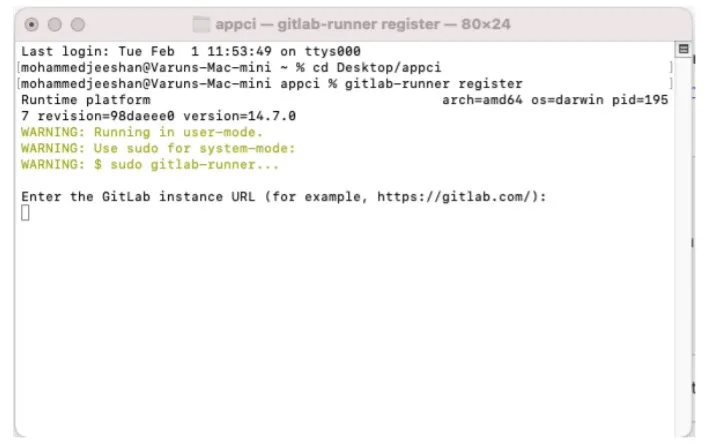
- For this, you go to your GitLab project Setting > CI-CD, and here you can find your Gitlab instance URL. Example:- https://gitlab.com/
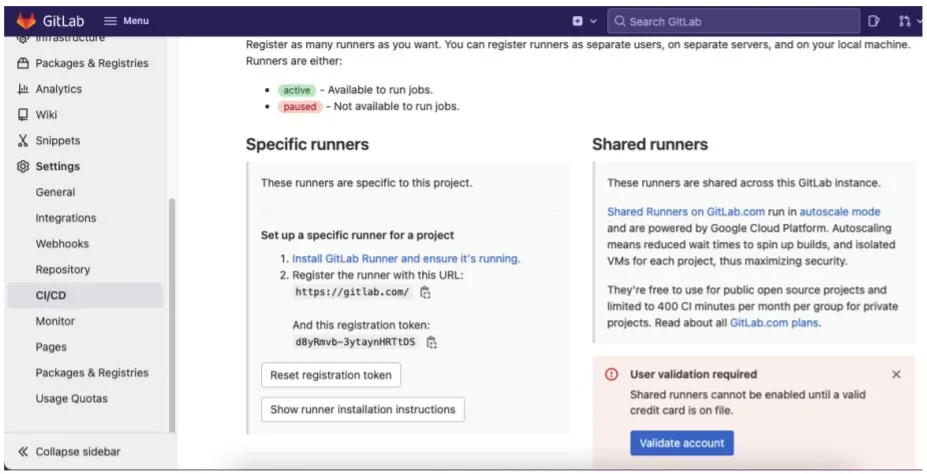
- Third, it will ask you for your registration token. You can see my registration token in the above image. You can also find your token.
- After this, it will ask you to Enter a description for the runner: “XYZ” you can add any description for your runner.
- After this, it will ask to Enter tags for the runner (comma-separated):
This is an important part. You should enter unique tags, for example, MjCI,
MjCD. in my case. Why should it be unique?
- After this, your runner will register successfully, and it will ask you to enter an executor.
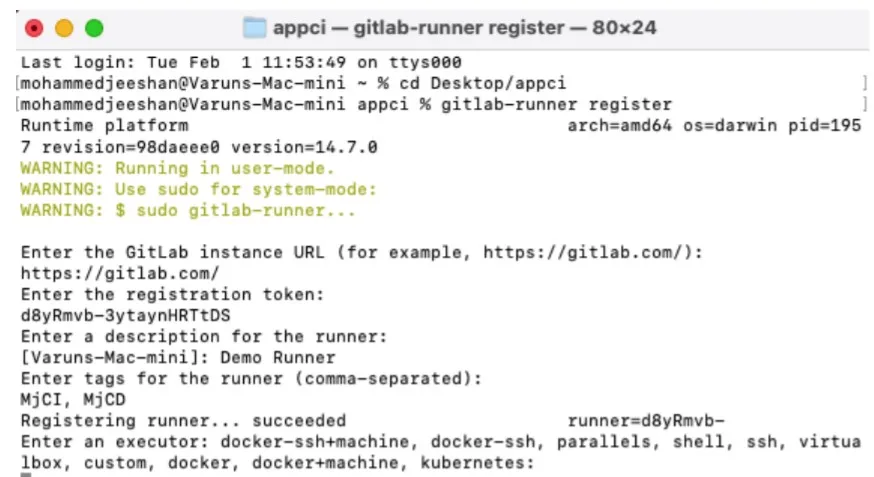
- After picking an executor, you will get Runner registered successfully. All you should be doing is taking charge of starting/initializing it!! But if you find this running already - let the config reload all of them automatically!
- Finally, just run a simple command gitlab-runner start.

Suppose you get any error while you run the GitLab-runner start command,
don't panic.
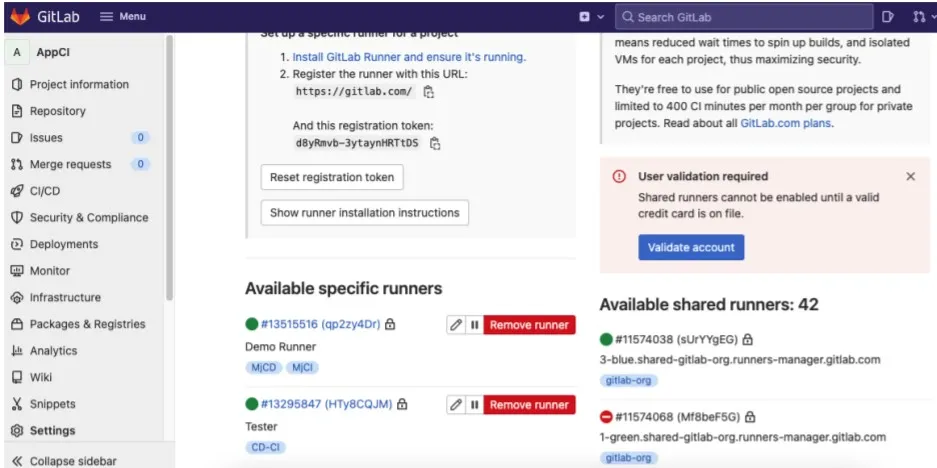
- go to your Gitlab project Setting > CI-CD & see if your runner has green tik or not.
- If it has green, then it's okay. If it is not green & you again confuse why it happens only with you
Don’t worry; I have a solution for this error, and it should work. Just run the brew command, which is brew services start GitLab-runner. For this command, make sure you have installed brew on your Mac. If it is not installed on your Mac, then go through this link https://brew.sh/
It’s not a proper solution, but it works for me. You can also try this.
But to make sure our runner is working in our local machine for this, just run the Gitlab-runner verify command.
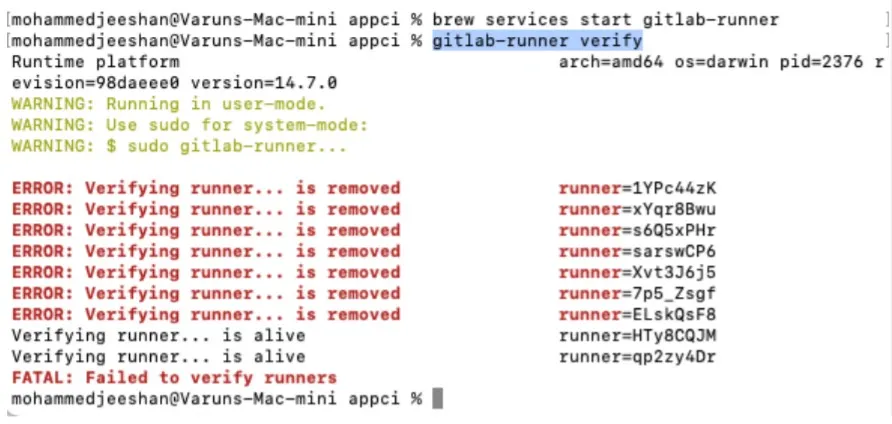
Here you can see that my two runners are alive this time, which I can use. You can also verify that its token number is the same.
Step-5: Time to write our .yml script!!
You can read How to write a .yml script in detail by following these links.
My experience: I want to tell you what problem I faced while writing a script for my .yml file. I was getting a different type of error when I pushed my code.
Sometimes, I get an invalid .yml format.
Solution: When you write any script just for confirmation, follow this link http://www.yamllint.com/ . Basically, it’s an online .yml validator tool.
Sometimes, my pipeline is stuck.
Solution: if your pipeline status displays as stuck, then you have made two mistakes; first, your runner is not online, which you are using.
For this, just run the GitLab-runner verify command, as we know. If your the runner is alive, then 100% sure your script format is correct, but you have added some deprecated or unknown lines in your .yml file.
Note: I don’t know why GitLab allows the wrong keywords or lines. In my case, I wasted 4-5 hours trying to know why my pipeline status was showing stuck when my runner status is showing online & alive.
Sometimes, my pipeline status fails.
Solution: Suppose all is good in your case means your runner is online and your .yml script is also good, but you also get pipeline failure. In that case, my suggestion is to please write a simple script. For example: -
   stages:
   - build
   build_project:
   stage: build
   script:
   - echo 1st Script Executing.
   tags:
   - CD-CI
Here I am defining only one stage for my pipeline - Which name is built, and within this stage, I am just printing a simple text line? You should also try this first before doing any advanced things.
Ensure tags are the same as you enter during the runner registration time. If you forgot, don’t worry; you can check these tags in the project settings where you see your runner.
You can also run the script without adding tags, but it works only when you have a single runner register with your machine.
For more information on implementing CI-CD, please go through this link.
Setting up GitLab CI for iOS projects
Hi, I am sharing my .yml file, which will help you understand how it works.
    stages:

    - build
    - testing
    - archive
    build_project:

    stage: build
    script:

    - echo 1st Script Executing
    - xcodebuild clean
    -project TestingCi.xcodeproj
    -scheme TestingCi | xcpretty tags:
    - CD-CI
    build_testing:
    stage: testing
    script:
    - echo 2nd Script Executing
    - xcodebuild clean
    -project TestingCi.xcodeproj
    -scheme TestingCi | xcpretty
    - xcodebuild test
    -project TestingCi.xcodeproj
    -scheme TestingCi
    -destination 'platform=iOS Simulator,name=iPhone 8,OS=15.0' | xcpretty -s

    tags:

    - CD-CI
    archive_project:

    stage: archive

    script:
    - echo 3rd Script Executing
    - xcodebuild clean archive
    -archivePath build/TestingCi
    -scheme TestingCi
    - xcodebuild
    -project TestingCi.xcodeproj
    -scheme TestingCi -archivePath /Path/To/Output/TestingCi.xcarchive archive
    only:
    - master
    artifacts:
    paths:
    - build/
    tags:
    - CD-CI
After this, your project will automatically achieve, and you can also download your .ipa from your GitLab project. If you are testing, please remove only: - master lines from your .yml file if you are testing. These lines mean your archive stage runs only when anyone commits on the master branch.
How to Publish iOS apps to the App Store or TestFlight?
- We can deploy our app to the App Store or Test Flight with the help of different types of open source tools which one is FastLane.
- Fastlane exponentially is a flexible open-source platform whose only aim is to
simplify/minimalize Android (or its residuals) and work productively towards iOS deployment.
Thereafter, automating every single aspect of your development and later releasing the required workflows won't be that challenging!!
Now the next question is How to install Fastlane on a local machine?
There are two ways to install Fastlane on a local machine. The first one uses brew, while the second one uses gem. I personally recommend you; please choose option one using brew. For this, you go to the terminal and run brew install Fastlane. You can also check this link https://formulae.brew.sh/formula/fastlane .
After installing Fastlane in your mac, you have to initialize Fastlane for your project. For this, go to the project directory using the terminal & run fastlane init command. Before running this command, please read these lines also.
- Again, you have two options first one go with Fastlane normal version
- Go with the beta version, the beta version provides more control as compared to the regular version, you can choose any options.
https://docs.fastlane.tools/getting-started/ios/setup/
(Normal
version)
https://docs.fastlane.tools/getting-started/ios/fastlane-swift/
(Beta
version)
All above-given links are official, which I also follow during CI-
CDimplementation. One thing if you are using the Fastlane beta (Fastlane init
swift)command, then please follow this link
Auto-deploy iOS app to TestFlight using Gitlab CI and Fastlane
I think these links are sufficient to explain well about Fastlane - how to use
it with the IOS project??
Tags

 Facebook
 Twitter
 LinkedIn
 Pinterest