React Router is an open-source application programming interface (API)/standard library for Routing in React apps. It helps routers create and
navigate among different website URLs that build your web app.
They are for simplifying site navigation and enabling users to roam between
the components of a web application while preserving the state.
React Routers use dynamic and client-side routing; everything is a component
in React Router while your app is rendering.
It helps support creating a single-page web application (SPA) while requiring
no page refreshing when the user navigates.
These Routers can also provide unique URLs for all active web app components,
making them more shareable.
For example, a white screen flash or blank page scenario is avoided by
preventing a page refresh and using Router or Link.
All in all, a React Router makes use of a component structure to call on
components that display the information appropriate/adequate for users.
Let's explore this hot topic of using React Router V6 library (still in its
beta phase) so that you can smoothly incorporate it into your React app. This
comprehensive guide will also give you a peek into what new features are in
its latest version, like the change in its size from 9.4kb to 2.9kb, which is
a -70% reduction in its bundle size. But before that, scroll down to see what
else this guide has for you -
What is a React Router?
A React Router is one of the increasingly common ways to provide a more
seamless user experience (UX) to people visiting web apps.

React Routers allow people to use a web browser's functionalities like
clicking on the back button and refreshing the page while keeping the view of
the application in its correct state.
What is the fundamental purpose of using React Router?
The React Router enables the navigation among views of various components in
React Apps, allowing changing URLs in a browser and keeping the user interface
in sync with those URLs.
Is React Router a framework?
ReactJS Router has been a popular routing web framework for React since its
launch. The best part of this framework is that it comes with a beautifully
designed library of intuitive components.
The React router allows devs to build a declarative routing system for a React
app, enabling you to declare exactly which of the members has a specific
route.
Essentials for Routing in React
To take the full advantage of this comprehensive guidepost
, kindly make sure you have the following essentials installed on
your system:
-
Need of a development environment running Node.js (version >= 12. x.x). To install it on macOS or Ubuntu 18.04, follow the steps in How to Install Node.js , npm/npx or yarn, and VS Code for the local development environment on Windows macOS and Ubuntu.
-
Requirement of a React development environment set up along with a React App .
-
You'll need basic knowledge and hands-on JavaScript , ReactJS, React Hooks, HTML, CSS, Build a Website with CSS series, and How to Code it in JavaScript.
Getting Started with React Routers
To get started with React Router, you first need to create a new React app
using the following command on the terminal window -

It is to generate the project directory. After that, navigate inside the
project directory, and install the required dependencies to add React Router
v6 library.
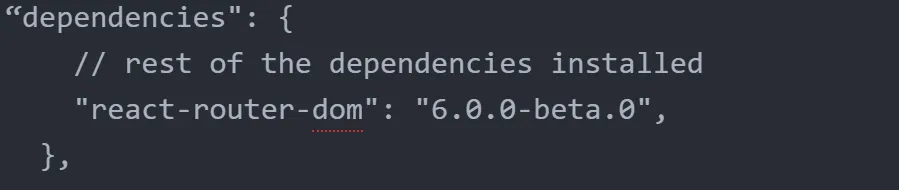
When the dependency is with you, open the package.json file in your
favorite code editors like Sublime Text or
Atom or the default text editors from the particular OS. Once that's over,
you will see the dependency version of the react-router-dom library, as
shown below -
Various Packages in React Router Library
React Router library comes with three different packages concerning npm, and
each has its purpose -
- react-router-dom
- react-router
- react-router-native
The react-router package is for peer dependency to the other two packages
mentioned above.
For React apps, the react-router-dom package is used for routing. And the
react-router-native comes with bindings that ones use for developing React
Native apps .
Now that you almost have the necessary things, let's create the first route.
Building your first route with React Router V6
Start by creating the first route using React Router library, and then open
the src/App.js file . And when that file is open, add the import statement
to pull things from the library -

It is the first component that you'll import from the react-router-dom
library. You need to do it since you will require to wrap various routes into
a single one. And to keep track of the history of routes in the React app, it
uses the HTML5 history API.
Also, the Router part in the above snippet is the alias that enables you
to write the code quickly. So, it's in the recommendation to import it and put
it at the top-level component in the component hierarchy of a React app -

Now, once that’s over, it’s time now to import the next component from the
react-router-dom , the new Routes -

The above one is an upgrade to the previous switch component. Thus, it
includes -
- Relative routing
- Linking features
- Automatic route ranking
- Nested routes, and
- Layouts.
And the last needed component from the react-router-dom is Route
(responsible for rendering the UI of a React component).
Why?
Because it has a prop named as a path that matches the app's current URL, and
the second prop is the element that invokes the Route component the moment it
encounters an existing URL and tells it - which React component is for
rendering.
Note: The element keyword here is a new addition to the V6 version of
the React Router. Earlier, you would be using the prop called component in its
V5 version.
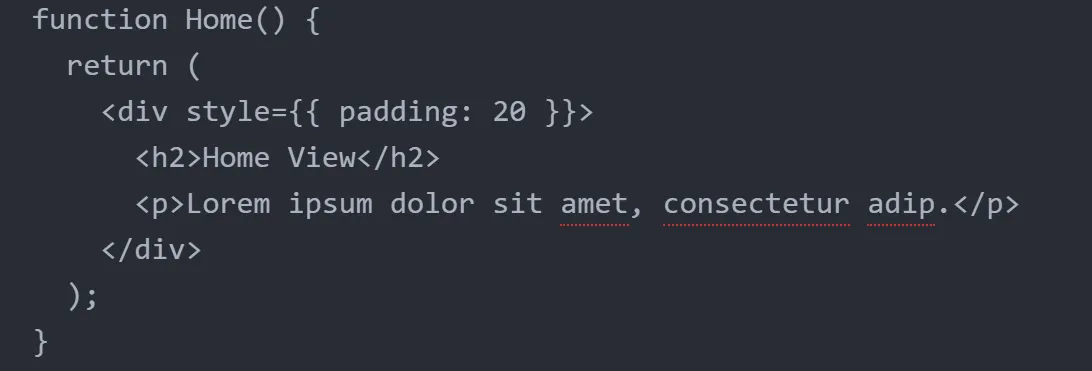
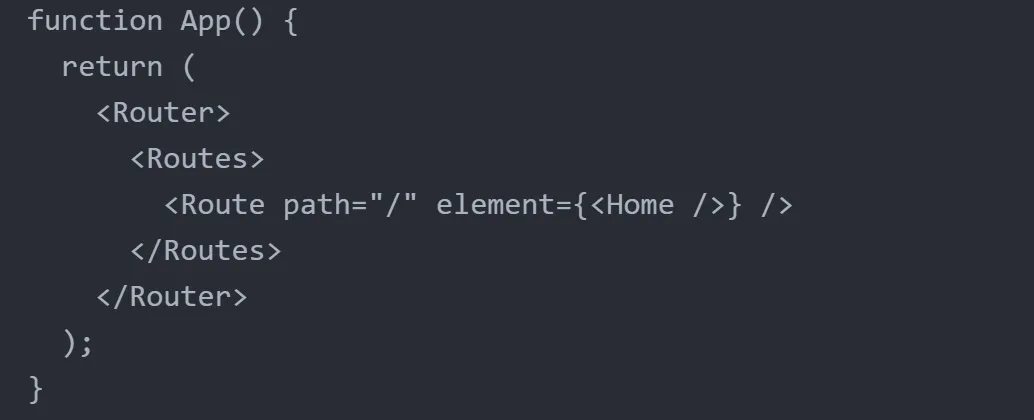
Hence, to build the first Route, create a primary functional component called
Home that returns some JSX -
Once the above component is ready, update the App function using the route below. The best part of this V6 library of React Router is
that the element prop of a Route component now gives access to pass a React
component rather than merely mentioning the React component's name. It makes
it easy for devs to pass props down the routes, as shown below:
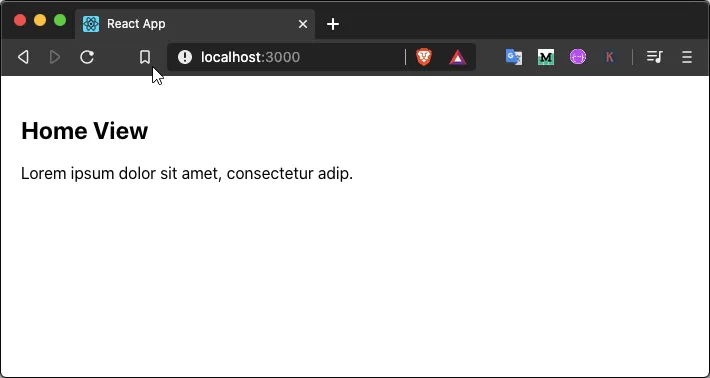
So, to observe it working before you, head back to the terminal and begin the
development server using the command yarn start.
Then, visit the URL (upon which you have hosted the project) like this one
http://localhost:3000 in your browser window.
Look at the output once the above step is over:
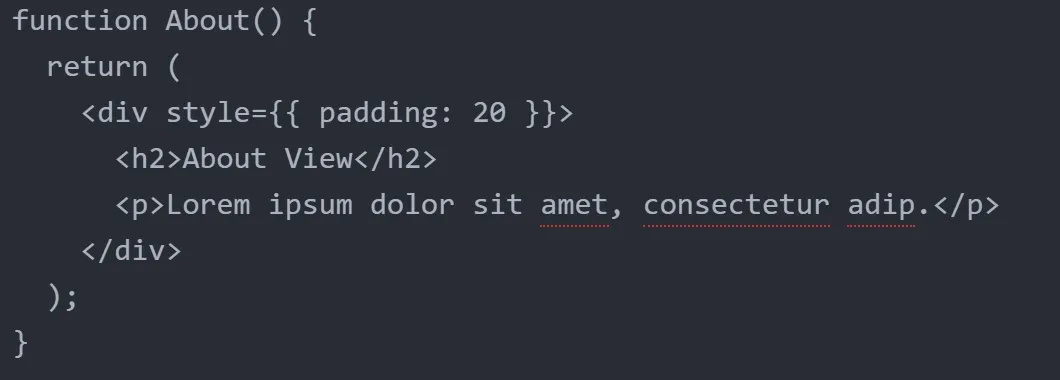
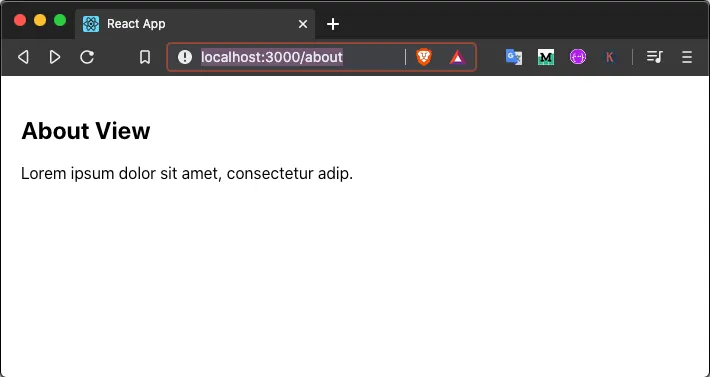
Now, let's quickly make another function component - About. Its rendering
begins when the URL in a browser is - http://localhost:3000/about; the out
is shown below after that step:
Next, add the Route to the About component like this:
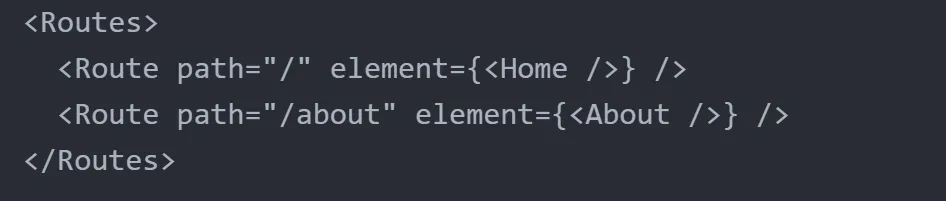
Now, again head back to your web browser and visit the About URL -
http://localhost:3000/about:
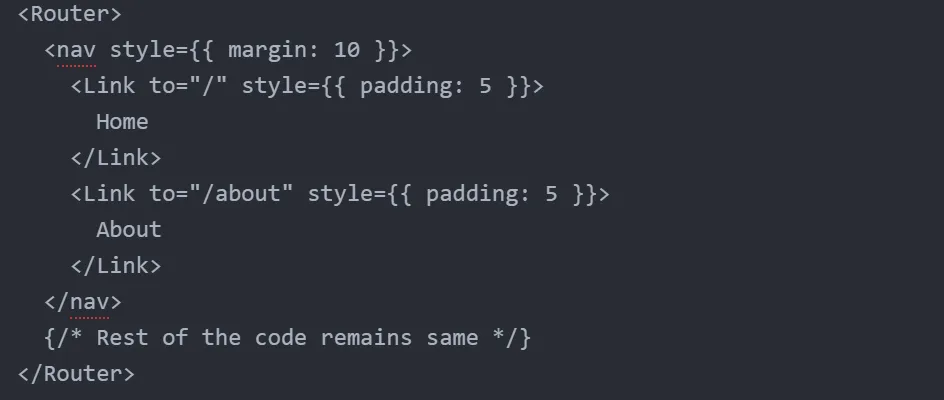
How to add a navigating menu?
To navigate over a particular route inside the React app or the two existing
routes, you would need to add a minimal navigation bar using the Link
component from the react-router-dom .
Thus, start by importing it like this:

Use an anchor tag like the below one to navigate between different web pages
in HTML:

This approach in a React app will lead you in developing to refreshing a web
page whenever the rendering of a new view or page itself begins.
**Remember, ** it isn't any advantage you are looking for while
incorporating a library like React. So, to steer away from refreshing the web
pages, the react-router-dom library comes with the Link component.
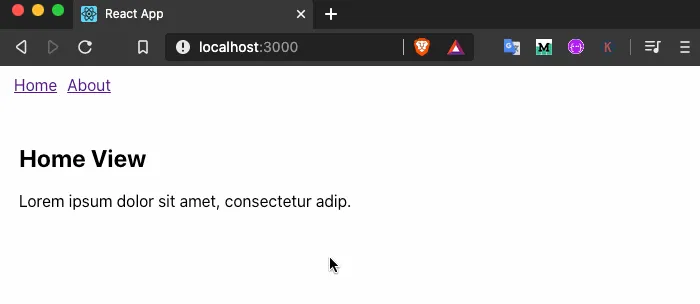
Now, let's get inside the App function component and create a navbar like the
one shown in the below code snippet:
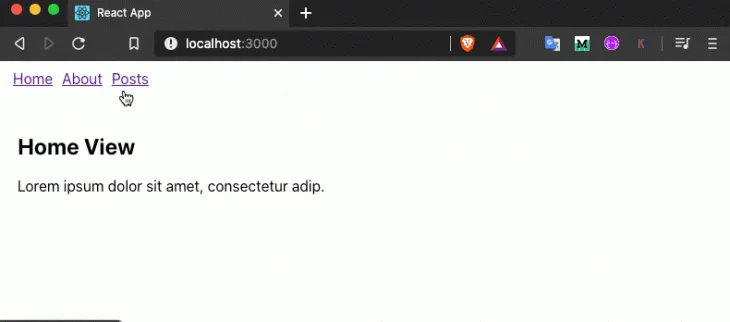
Next, go back to the web browser to see how the navigation bar is working:
Handling nested routes
The concept of Nesting in routes is quite essential to understand. Because
generally, devs assume that an inevitable part of a web page remains constant,
and only the child part changes.
For instance, while visiting a simple blog on a website, the blog's
title is always displayed, and then a list of other/related blog posts is
shown right beneath it. However, the moment you click a blog post, the list
gets replaced by the contents or the description of that particular blog.
It is an example of how the latest version of the React Router handles nested
routes. But in the React Router v5, there were options to define them
explicitly, and it is not the case in any of the latest version(s).
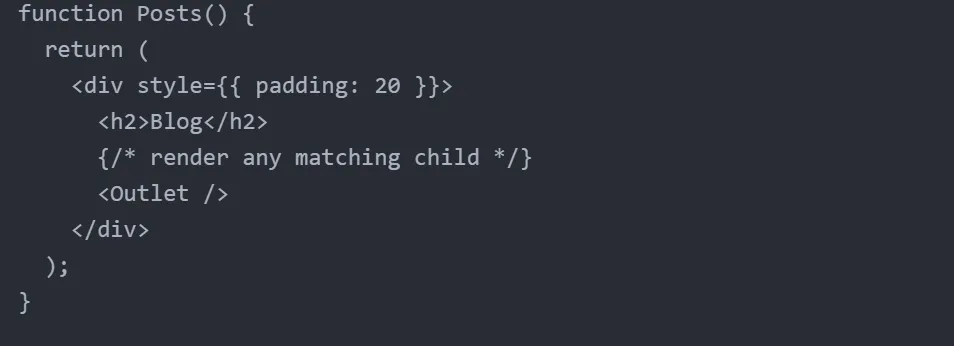
The latest version picks one of the best elements from the React Router
library - Outlet. It is to render any matching children for a specific route.
Hence, to jump-start, begin by importing the Outlet using the react-router-dom
library as mentioned below:

If you have a crazy idea like mimicking a primary blog, add a few mock data in
the App.js file. Below is the code snippet that has an object - Blog-Posts.
This object will further consist of various objects as properties. And every
object has the following three things - a unique slug, its title, and the
description of a blog post -
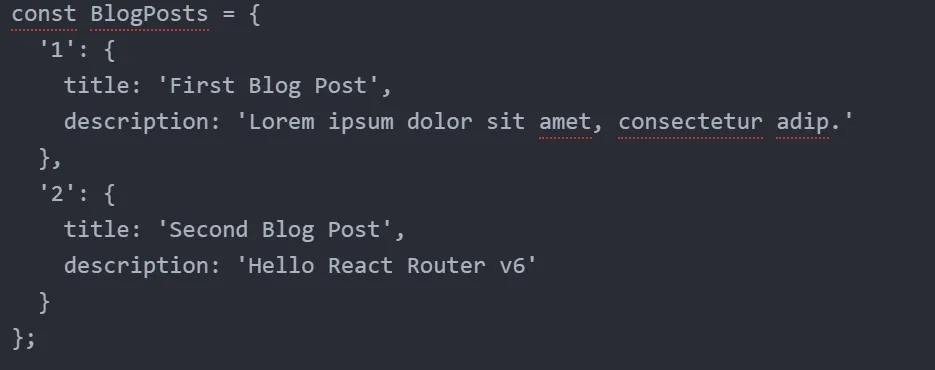
You will get to use this unique slug in the URL of a browser to see the
contents of each post.
Thus, your next task would be to create a function component - Posts that will
display a list of all blog posts:
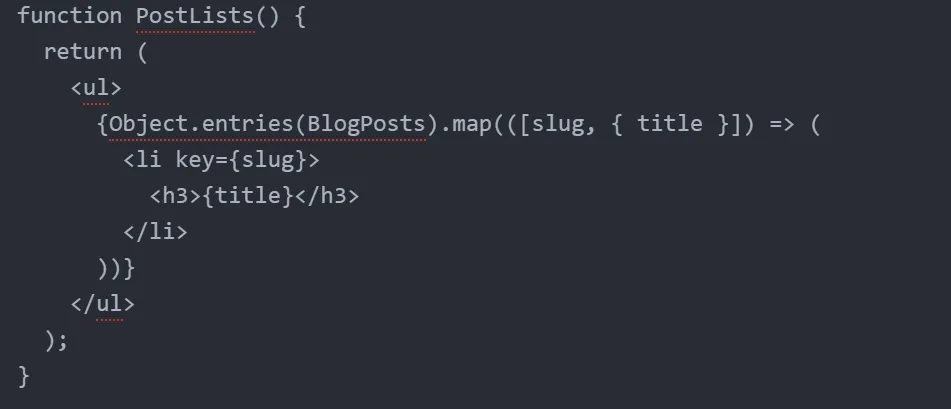
Now, similar to About, Define another component - PostLists. It will display a
list of all posts when the URL in the browser is -
http://localhost:3000/posts .
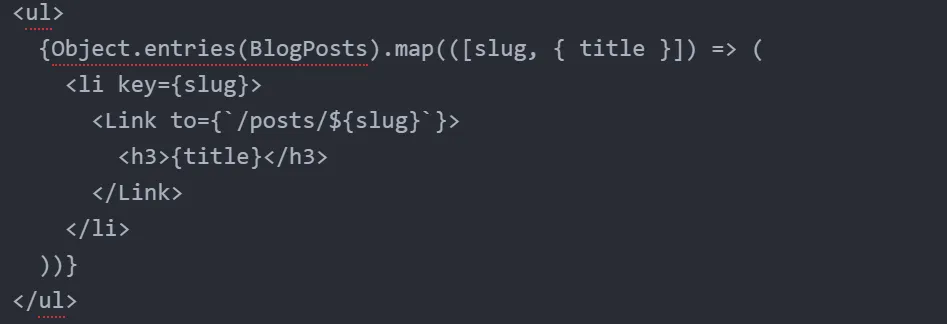
So, to have this, you would need to use JavaScript's Object.entries() method
to return an array from the object - BlogPosts. This array gets mapped to
display a list of titles in all blog posts:
Next, make modifications in the Routes of the App function component like
this:
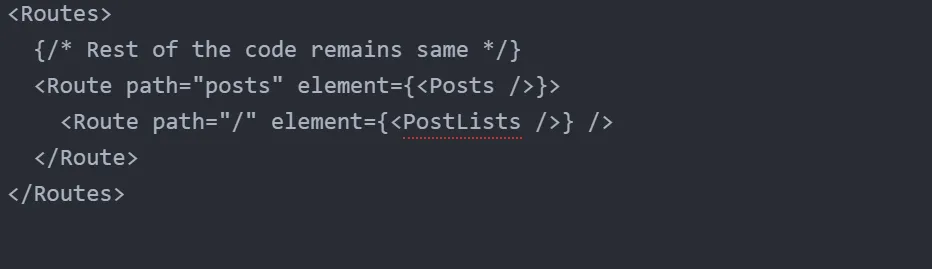
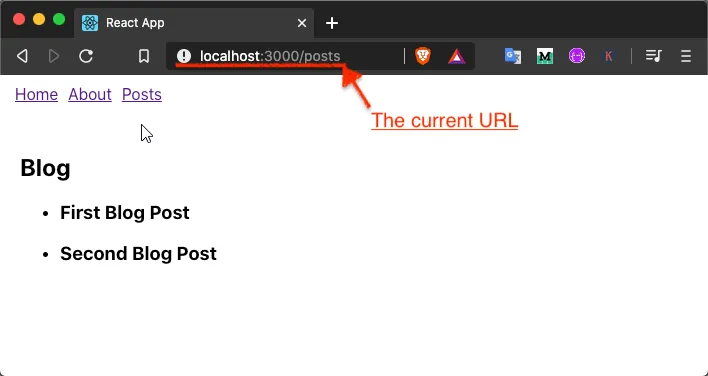
Now, if you observe, all it indicates - whenever there is a trigger in the
URL; http://localhost:3000/posts , the list of blog posts will render.
Hence, the component PostsLists -
Accessing dynamic and URL parameters of a route
So, to open the individual posts by hovering your cursor over the blog posts
and clicking the one you like the title of from the rendered list, all you
need is to wrap up the title of each post inside a Link component in the
PostsLists component.
Next, define a path to every post using each post's slug. Here, /posts/ prefix
is for the path that will keep the web browser to be consistent -
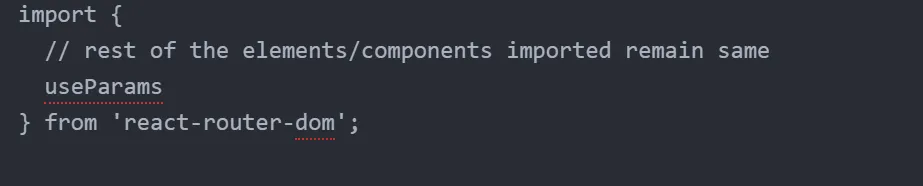
Next, you need to import a hook - useParams using the react-router-dom
library. It will allow you to access any dynamic parameter that a specific
route (or slug in our example) might have.
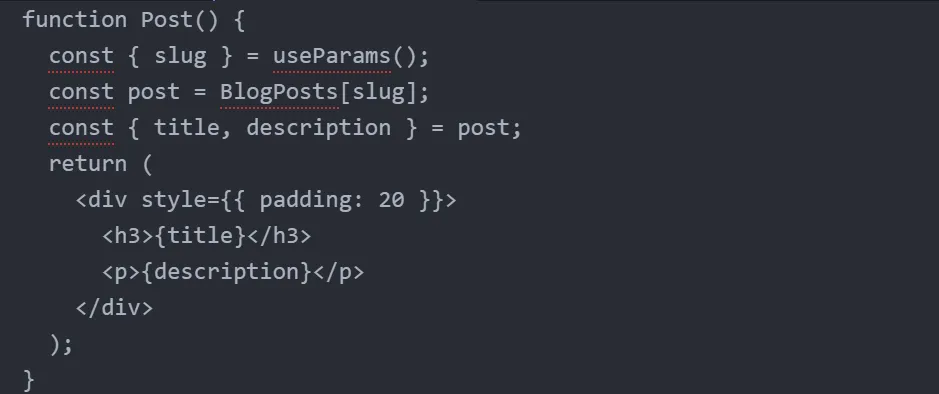
The title and the description of each blog post are based on the slug
component. The need to access them comes whenever there's a trigger in the
post related to that URL to display the content:
Once you have imported the hook, it's now time to create a new function
component - Post. This particular component will hook the current slug of the
post from useParams . After that, create a new post variable with the
value of the properties or contents of a blog post. And you can use rendering
to de-structure the contents of this post variable:
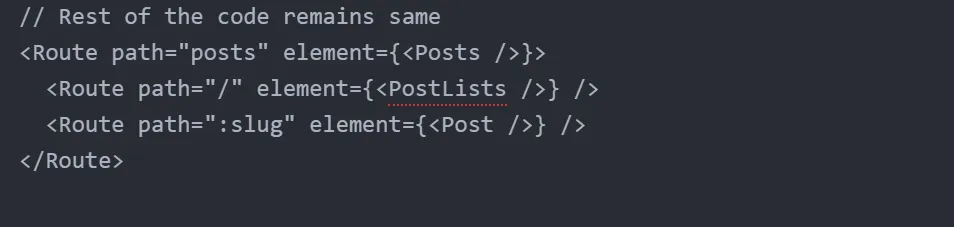
And lastly, to render the contents of each blog post, all you need to do is to
add a dynamic route: slug in the App function component:
Here is the net output for the above handwork:
Does something happen while navigating TWO routing systems?
An API enables the talk between a piece of code to another part of code and
nothing else. It is not external where you pass some value and get the output.
A full-fledged working software (a web app or a mobile or desktop app) has the
front-end and backend code. And with the help of an API, they communicate to
provide users with their queries.
Thus, when devs write codes for both ends, they potentially write them in
multiple languages that may not necessarily have the same routing rituals, but
don't worry! Because the backend works as an API, and the user doesn't have to
interact with it.
And that's where the routing comes to the rescue. They manage the UX and allow
you to know how to address queries to the database that are not the same.
At the end of the day!
Hopefully, this comprehensive introductory guide will help provide you with
the necessary ingredients while learning to implement the React Router in
your app for the first time.
And suppose you're already aware of the previous versions of the React Router
library. In that case, I hope this guiding post makes you familiarize yourself
with an overview of the changes between the latest version and its previous
ones.
The source code for this routing library is available at this GitHub
repository.

 Facebook
 Twitter
 LinkedIn
 Pinterest