A very prevalent myth among beginner programmers is that server configuration is a pro job and can't be done easily. Well, it totally isn't the case. We are going to look at the steps involved in launching and setting up an AWS Elastic Compute Cloud (EC2) instance from
scratch.
What's an instance?
An instance is a virtual server inside the AWS cloud architecture. It allows us to setup and configure its operating system and other applications according to our needs. You can connect to it through various protocols which you configure with.
Prerequisites
Nothing much at this point, just an activated AWS account should do nicely.
Step 1: Launching an EC2 instance
So, logon to your AWS account and go for EC2 service.It should look something
like this 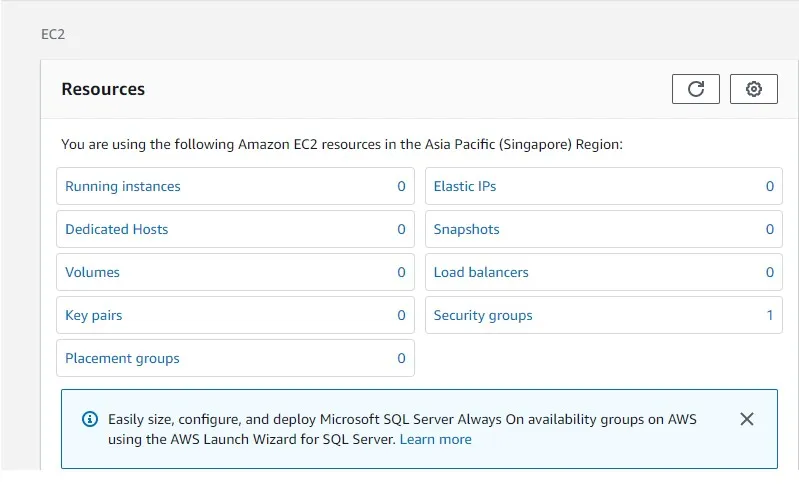 Start: As we can see, there are no running instances, so let's launch one. Click on Running instances and then Launch Instance button.
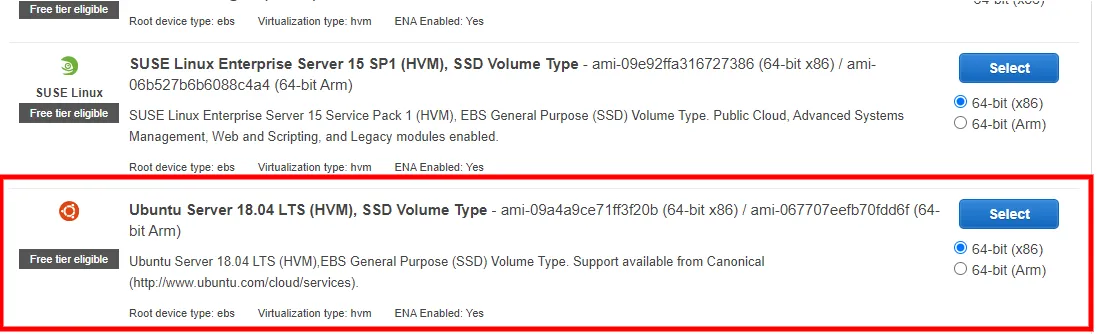
 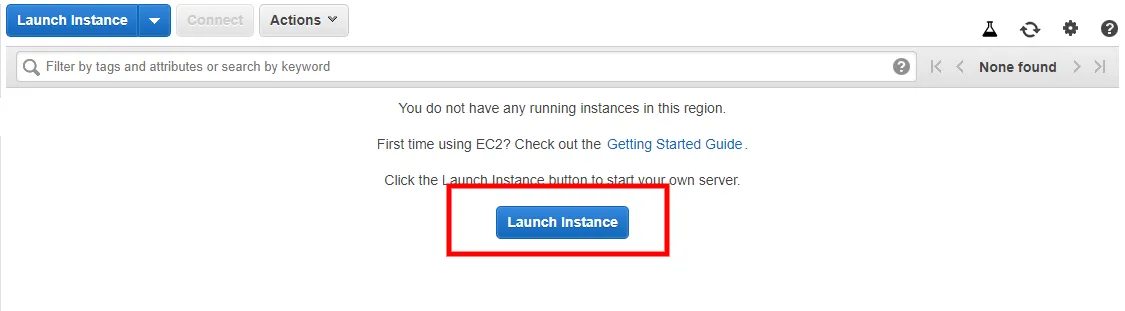 Operating System: AWS will ask you to choose the operating system you want to choose; select wisely; this will depend on your usage type and the application to be deployed. For now, I am going to go ahead and select Ubuntu18.04
 Instance Type: We must choose our instance type next up. They are of abundant types with different hardware configurations, go ahead and select what's best for you!
 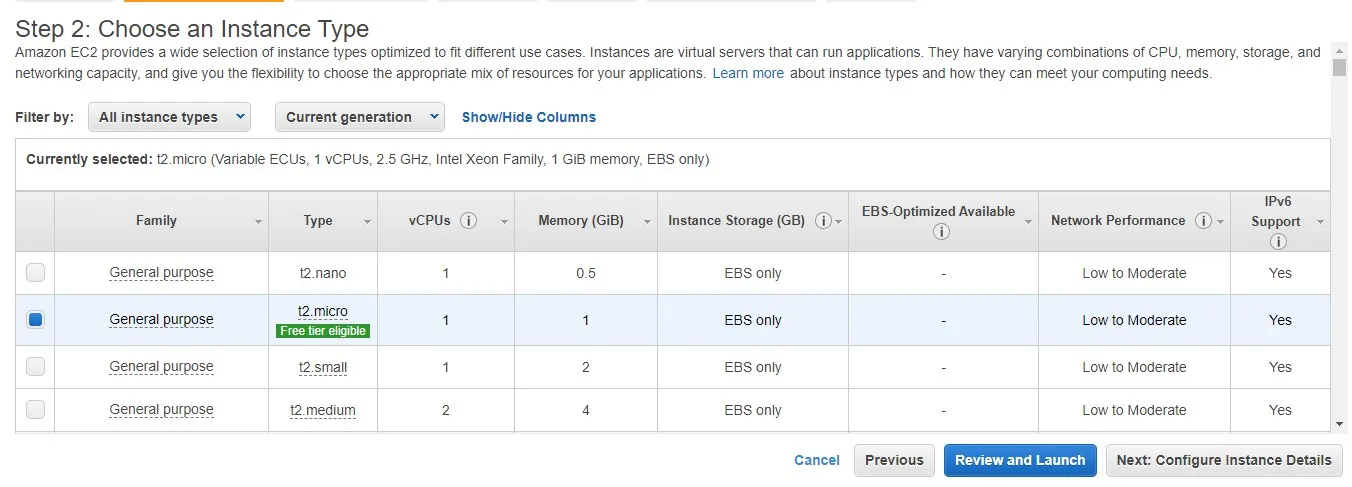 Intance Details: This step is, for instance, details, but for the most part, you can leave it for default as it is.
 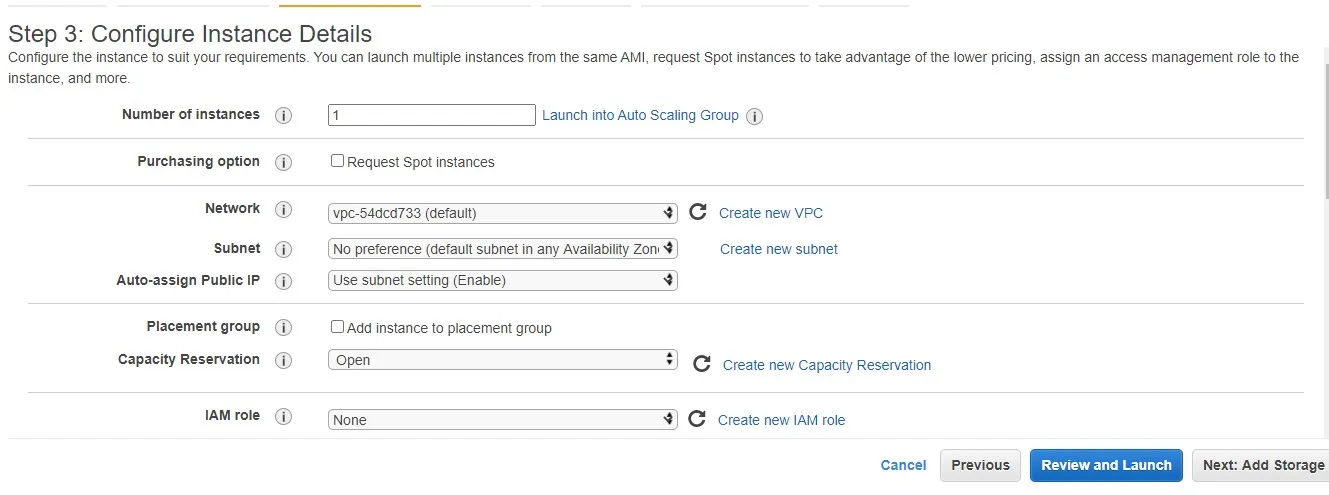 Security Groups: Next up, you'll be asked the storage you want to add
to your instance; by default, it's 8GB SSD, but you can increase the volume's size. With volume added, in the next screen, it will ask for some custom tags, which are not needed for now, so they can be left at default. The next step that is step 6 in this process is probably the most important. This is the screen for the same.
Security Groups: Next up, you'll be asked the storage you want to add
to your instance; by default, it's 8GB SSD, but you can increase the volume's size. With volume added, in the next screen, it will ask for some custom tags, which are not needed for now, so they can be left at default. The next step that is step 6 in this process is probably the most important. This is the screen for the same.
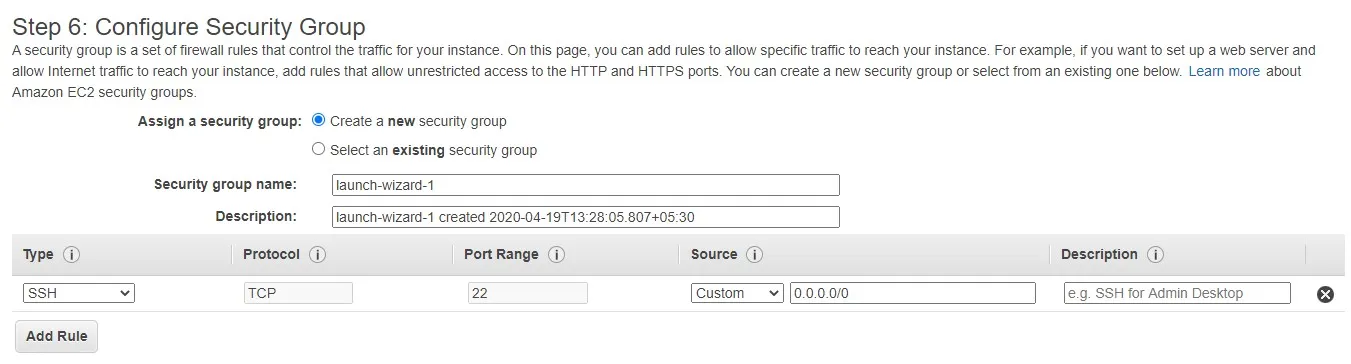
This screen defines all the protocols that you need to configure in the server that you are launching.
- SSH - Obviously to connect to the server
- TCP - If you want to use an extra port for the node or any other application like 3000, 4000, etc.
- HTTP - To allow requests at port 80
- HTTPS - To allow requests at 443 (SSL)
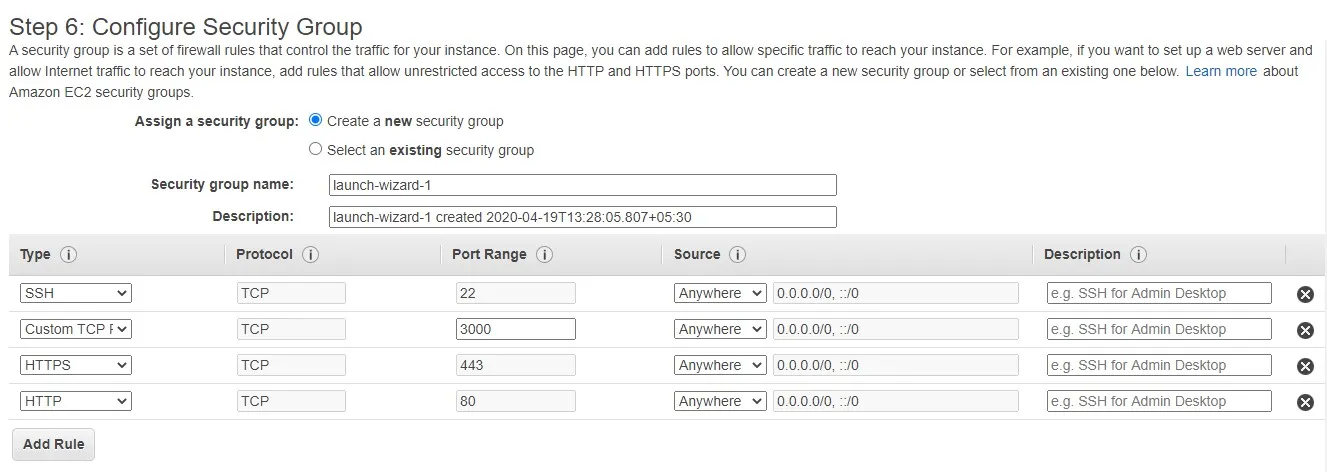 Tip: Remember to select all sources anywhere, or you won't be able to use these ports. If you want to restrict to a certain IP, select custom and enter your IP in the box next to it.
Finalize: Next screen in the process is Review and Launch. It will show all the basic details that you selected in the process. Review and click Launch. AWS will provide you with a key pair. It is a pem file. Please keep it safe, as you cannot download it ever again. After downloading the key pair, your instance is good to be launched.
 Your instance is now LIVE! This instance has been provided with a public IP through which you can see what runs on it, BUT if you restart or stop-start the instance, this IP will change. To avoid that, Scroll down to the elastic IP section in the sidebar and create an elastic IP from Amazon's pool of IP addresses. Then associate this elastic IP with your instance on the same screen. This will be your permanent IP for the server but can be later shifted to some other instance.
Step 2: Connecting to the instance
Let us go ahead and connect to our newly launched instance. We have our IP, and we have the key. That is all we need. But first of all, we need to make a private key out of our pem file. For that, download the software puTTY. It comes with an addon called puTTYgen. This tool can be used to convert the pem key file to a private key file. Connect to the instance using the username
'ubuntu', which is by default for the ubuntu OS instance.
Step 3: Configure the firewall
As you get in, after a successful login, run the following command to update the package repository.
$ sudo apt update
We now need to update and enable the firewall rules for our server security. For now, we want to allow SSH in the firewall because if you don't, you won't be able to log in with the firewall up and running. So,
$ sudo ufw allow OpenSSH
$ sudo ufw enable
Now to check if the rule we wanted is correctly added.
$ sudo ufw status
Step 4: Web server
We need a web server, and you can go for any of the most common ones like apache or nginx or any other
For Apache:
$ sudo apt update
$ sudo apt install apache2
$ sudo service apache2 status
For Nginx:
$ sudo apt update
$ sudo apt-get install nginx
$ sudo service nginx status
With this being installed, we need to allow them in the firewall as well, so
$ sudo ufw allow in Apache Full
or
$ sudo ufw allow 'Nginx Full'
Step 5: Database
We need a database for our complete application deployment with the web server up and running. We will go for MySQL local installation here. Essentially if you noticed, we are actually going for LAMP (Linux Apache MySQL Php) stack.
$ sudo apt update && sudo apt install mysql-server
And to verify
$ sudo service mysql status
The MySQL server is running, but we need to secure it now. So, for security
$ sudo mysql_secure_installation
The installation will begin, and ask for basic questions, press enter on the the first step and then 'Y' and all others.ENTER | Y | Y | Y | Y
Your MySql server is now secure with credentials. To verify it, execute the following command
$ sudo mysqladmin -p -u root version
We also need a mysql user. We don't want to use root user credentials in our applications. Execute the following series of commands to create new mysql user.
$ sudo mysql
> CREATE USER 'newuser'@'localhost' IDENTIFIED BY 'password';
> GRANT ALL PRIVILEGES ON * . * TO 'newuser'@'localhost';
> FLUSH PRIVILEGES;
> exit;
Replace "new user" with your desired username and password with your desired password.
Step 6: Install Php
this command is pretty straightforward as well, go ahead and execute the following, and it will install php on the server.
apt install php php-cli php-fpm php-json php-common php-mysql php-zip php-gd
php-mbstring php-curl php-xml php-pear php-bcmath
Again, need to verify its installation and version
$ php -v
PHP 7.2.24-0ubuntu0.18.04.3 (cli) (built: Feb 11 2020 15:55:52) ( NTS )
Copyright (c) 1997-2018 The PHP Group
Zend Engine v3.2.0, Copyright (c) 1998-2018 Zend Technologies
with Zend OPcache v7.2.24-0ubuntu0.18.04.3, Copyright (c) 1999-2018, by Zend Technologies
Step 7: PhpMyAdmin
We need a UI to see access our database, so what better than the infamous phpmyadmin plugin? So, just run the following to get and install phpMyAdmin
$ sudo apt update && sudo apt install phpMyAdmin
$ sudo ln -s/etc/phpMyAdmin/apache.conf /etc/apache2/conf-available/phpmyadmin.conf
$ sudo a2enconf phpmyadmin.conf
$ sudo service apache2 reload
We now take one last step to secure our phpmyadmin url. So by default, it will open up on
http://(public_ip)/phpmyadmin, but we dont want that. We want it to open up on
an alias url.
$ sudo nano /etc/apache2/conf-available/phpmyadmin.conf
Alias /your_url /usr/share/phpMyAdmin
Put your desired url in place of 'your_url'. Then press colon(:)x to exit file, it will ask do you want to save it, Type 'y' and press ENTER.
$ sudo service apache2 reload
And there you go, your phpmyadmin will now open up on http://(public_ip)/your_url
Step 8: Enable .htaccess
Enabling .htaccess is crucial for our web project to run on the server. We are assuming we installed apache server, so just go throught these series of command and enable .htaccess.
$ sudo apt-get update
$ sudo a2enmod rewrite
$ sudo nano /etc/apache2/sites-enabled/000-default.conf
In the file that opens up, Add the following lines within the block of virtual host.
<Directory "/var/www/html">
  AllowOverride All
</Directory>
Save the file & exit.
Step 9: Apache Configurations
Some apache web server configurations are also needed to provide proper access to all applications.
$ sudo nano /etc/apache2/apache2.conf
When the file opens up, scroll down to
<Directory /var/www/>
    Options Indexes FollowSymLinks
    AllowOverride All
    Require all granted
</Directory>
And Change AllowOverride None to AllowOverride All . Also enter the following snippet there:When the file opens up, scroll down to
<Directory /var/www/html>
    Options -Indexes
</Directory>
Towards the end of the file, enter these two configurations, which also help protect server identity.
ServerSignature Off
ServerTokens Prod
Step 10: Install essential packages
Go ahead and install all the required packages that you may need for your project deployments.
cURL:
$ sudo apt-get update
$ sudo apt-get install curl
$ sudo apt-get install php7.2-curl
$ sudo service apache2 restart
Zip/Unzip:
$ sudo apt-get update
$ sudo apt-get install zip unzip
NodeJs:
$ sudo apt-get update
$ sudo apt install nodejs
NPM:
$ sudo apt-get update
$ sudo apt install npm
PM2:
$ sudo apt-get update
$ sudo apt install pm2 -g
Tips
Tip 1: If you need to update your node version to the latest or latest-stable version, you can use a npm package called 'n'. It helps in getting the latest version of node using npm.
$ sudo npm cache clean -f
$ sudo npm install -g n
$ sudo n stable or
$ sudo n latest
For the changes to take effect, you need to reboot the instance from AWS account or through command.
Tip 2: If your node, angular or any other application which runs on a specific port say 4000, You need to first add a Custom TCP rule for it in your security group and then allow that port in your firewall by
$ ufw allow 4000
Tip 3: Also a good read on the topic Setting up with Amazon EC2
Tip 4: Make sure to use reverse proxy your applications using Nginx or any other sources. Find out all about it on How to set up Nginx to reverse proxy angular & node apps
Summary
Its a wonderful feeling seeing your server up and running by the end of this
long process. So, now that we have demonstrated all the base steps to launch a
server, why don't you go ahead and launch one for yourself. Also, let us know
what steps you took to tighten the security, it should be an interesting
discussion.
Tags
Backend development
aws Ec2